

Urban light photography is a captivating blend of technical precision and creative storytelling. It transforms the night into a luminous canvas where architecture, traffic, streetlights, and neon signs all come to life. When done right, it can turn an ordinary city scene into a dazzling display of motion, color, and mood. Whether you’re a hobbyist or an aspiring professional, mastering urban light photography opens up an exciting world of visual possibilities.
In this article, we’ll walk through how to prepare, shoot, and edit compelling nighttime images that truly own the night.
Get to Know Your Environment
Great urban light photography starts with choosing the right location. Not every city block or street corner will offer visual interest. Look for scenes with contrast—old and new architecture, flickering signage, busy intersections, or reflections off wet pavement. Rooftops, pedestrian bridges, or parking garages can give you unique perspectives of city lights from above.
It’s also important to scout your location during the day. Take note of framing opportunities, interesting angles, and areas with lots of artificial light sources. This will save time when the sun goes down and help you shoot more efficiently in low-light conditions.
The Gear That Makes It Happen
Night photography requires a few essentials:
- Camera with manual mode: Allows full control of shutter speed, aperture, and ISO.
- Tripod: Necessary for sharp, long-exposure shots.
- Remote shutter release or self-timer: Reduces camera shake.
- Fast lens (low f-stop number): Lets in more light, especially useful for handheld shots.
While not mandatory, a wide-angle lens is often preferred for capturing sweeping urban scenes, while a prime lens with a wide aperture can help isolate subjects in low light.
Understanding the Exposure Triangle at Night
Balancing shutter speed, aperture, and ISO is crucial in low-light settings. Here’s how to approach each:
- Shutter speed: Longer exposures (5-30 seconds) let in more light and help capture light trails or glowing streets.
- Aperture: A wider aperture (like f/2.8 or f/4) lets in more light but can reduce depth of field. For cityscapes, f/8 to f/11 is a good range for sharp focus across the frame.
- ISO: Higher ISO can brighten the image but introduces noise. Try to keep ISO as low as possible without underexposing—800 to 1600 is often a safe range for night shots.
Creative Techniques to Try
Urban light photography offers countless opportunities for experimentation. Here are a few ideas to inspire your night shooting:
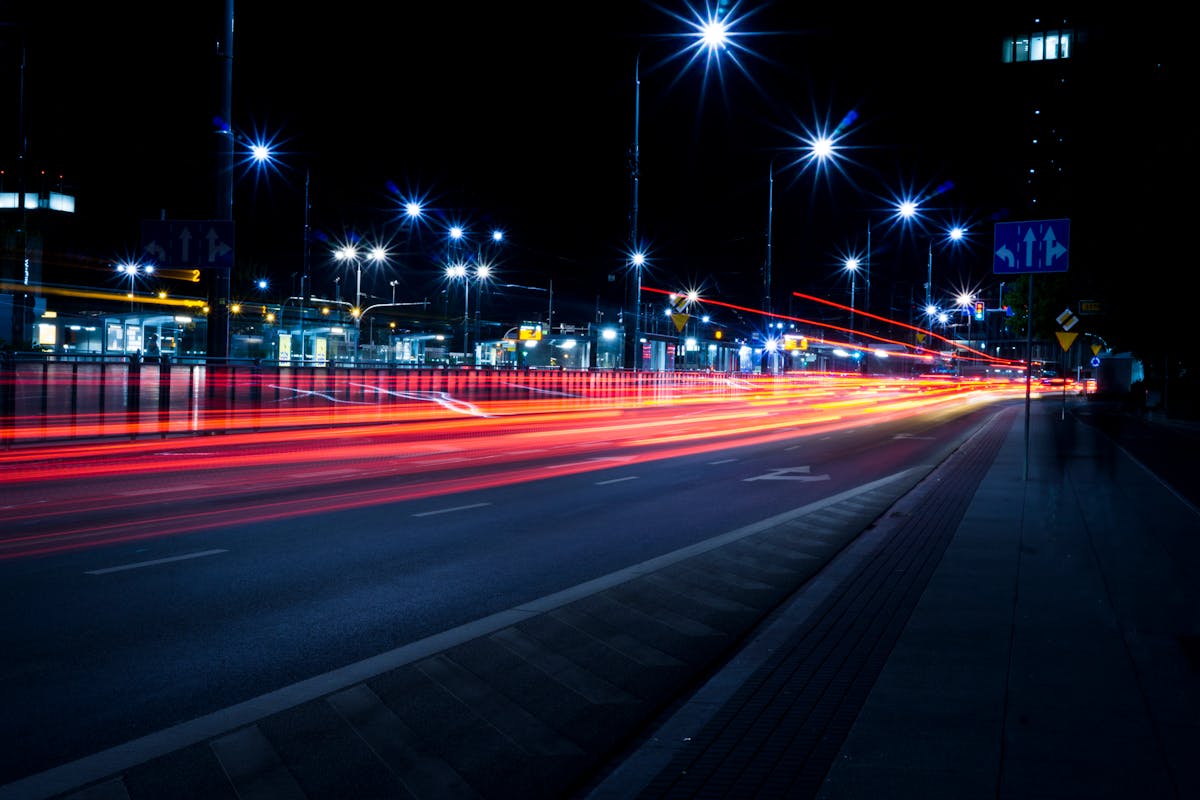
Light Trails
Capture the movement of cars and buses by using long exposures to turn headlights and taillights into streams of light. Set your shutter speed to around 10–30 seconds, frame your composition to include the roadway, and wait for traffic to do the rest.
Reflections
Wet streets, puddles, glass windows, and even shiny car surfaces can reflect city lights beautifully. After rain or in areas near fountains or rivers, these reflections can double the visual impact of your shot.
Neon Glow
Cities are full of neon signs, each glowing with its own unique color temperature. Use them to backlight portraits, highlight storefronts, or create abstract close-ups with a strong color theme. Adjust your white balance to preserve or enhance the mood the lights are creating.
Silhouettes and Shadows
Place a subject in front of a strong backlight—like a lit billboard or building facade—and expose for the background to create a moody silhouette. This technique is perfect for storytelling or adding human interest to architectural compositions.
Embrace Movement and Blur
Not every night photo needs to be tack-sharp. Intentional blur can add energy and artistic flair to your image. Try panning with moving subjects like bikes or taxis to keep them sharp against a blurred background. Or allow some ghosting by photographing crowds or passing pedestrians during a longer exposure.
Creative blur is especially popular at events or gatherings, where lights, people, and props are in motion. A great example is incorporating motion blur during a fun shoot setup with photo booth rental San Diego at an evening event—where the combination of motion and lighting creates spontaneous, expressive results that stand out from typical flash-lit portraits.
Post-Processing Tips for Urban Night Shots
Even with the best planning, your raw night photos may need some fine-tuning. Here are a few quick editing tips:
- Adjust exposure and contrast to bring out the full range of tones.
- Reduce noise, especially if you shot at a high ISO.
- Enhance colors by boosting vibrance and adjusting white balance to retain the natural glow of urban lighting.
- Sharpen selectively, focusing on key elements like buildings or light trails.
- Crop creatively to improve composition or eliminate distractions.
Editing tools like Lightroom and Photoshop offer all the control you need to refine your night photography into gallery-worthy images.
Conclusion
Owning the night with urban light photography is about more than technical settings—it’s about seeing your city in a new way. Every light, shadow, and reflection becomes part of your visual story. By combining thoughtful preparation, creative shooting techniques, and subtle post-processing, you can capture the magic that cities offer after dark. Whether you’re shooting glowing traffic trails, neon reflections, or motion-filled portraits, the night is your playground—and your lens is the key to unlocking its potential.